Brain Web API API alternatives
11 other iot APIs compared on authentication, HTTPS, CORS and documented endpoints.
| API | Auth | HTTPS | CORS | Endpoints |
|---|---|---|---|---|
| Brain Web API | API key | Yes | Unknown | 77 |
| Adafruit IO REST API | API key | Yes | Unknown | 71 |
| Netatmo | OAuth | Yes | Unknown | 22 |
| Influx OSS API Service | HTTP Basic | Yes | Unknown | 197 |
| ClearBlade API | No auth | Yes | Unknown | 220 |
| Hardware Sentry TrueSight Presentation Server REST API | API key | Yes | Unknown | 23 |
| Quick start - Telematics SDK | No auth | Yes | Unknown | 9 |
| smart-me | HTTP Basic | Yes | Unknown | 64 |
| groov View Public API | API key | No | Unknown | 10 |
| KeyServ | No auth | Yes | Unknown | 24 |
| MIMIC REST API | HTTP Basic | Yes | Unknown | 356 |
| PAC Control REST API | HTTP Basic | No | Unknown | 55 |

Adafruit IO REST API
IoT### The Internet of Things for Everyone The Adafruit IO HTTP API provides access to your Adafruit IO data from any programming language or hardware environment that can speak HTTP. The easiest way to get started is with [an Adafruit IO learn guide](https://learn.adafruit.com/series/adafruit-io-basics) and [a simple Internet of Things capable device like the Feather Huzzah](https://www.adafruit.com/product/2821). This API documentation is hosted on GitHub Pages and is available at [https://github.com/adafruit/io-api](https://github.com/adafruit/io-api). For questions or comments visit the [Adafruit IO Forums](https://forums.adafruit.com/viewforum.php?f=56) or the [adafruit-io channel on the Adafruit Discord server](https://discord.gg/adafruit). #### Authentication Authentication for every API request happens through the `X-AIO-Key` header or query parameter and your IO API key. A simple cURL request to get all available feeds for a user with the username "io_username" and the key "io_key_12345" could look like this: $ curl -H "X-AIO-Key: io_key_12345" https://io.adafruit.com/api/v2/io_username/feeds Or like this: $ curl "https://io.adafruit.com/api/v2/io_username/feeds?X-AIO-Key=io_key_12345 Using the node.js [request](https://github.com/request/request) library, IO HTTP requests are as easy as: ```js var request = require('request'); var options = { url: 'https://io.adafruit.com/api/v2/io_username/feeds', headers: { 'X-AIO-Key': 'io_key_12345', 'Content-Type': 'application/json' } }; function callback(error, response, body) { if (!error && response.statusCode == 200) { var feeds = JSON.parse(body); console.log(feeds.length + " FEEDS AVAILABLE"); feeds.forEach(function (feed) { console.log(feed.name, feed.key); }) } } request(options, callback); ``` Using the ESP8266 Arduino HTTPClient library, an HTTPS GET request would look like this (replacing `---` with your own values in the appropriate locations): ```arduino /// based on /// https://github.com/esp8266/Arduino/blob/master/libraries/ESP8266HTTPClient/examples/Authorization/Authorization.ino #include <Arduino.h> #include <ESP8266WiFi.h> #include <ESP8266WiFiMulti.h> #include <ESP8266HTTPClient.h> ESP8266WiFiMulti WiFiMulti; const char* ssid = "---"; const char* password = "---"; const char* host = "io.adafruit.com"; const char* io_key = "---"; const char* path_with_username = "/api/v2/---/dashboards"; // Use web browser to view and copy // SHA1 fingerprint of the certificate const char* fingerprint = "77 00 54 2D DA E7 D8 03 27 31 23 99 EB 27 DB CB A5 4C 57 18"; void setup() { Serial.begin(115200); for(uint8_t t = 4; t > 0; t--) { Serial.printf("[SETUP] WAIT %d...\n", t); Serial.flush(); delay(1000); } WiFi.mode(WIFI_STA); WiFiMulti.addAP(ssid, password); // wait for WiFi connection while(WiFiMulti.run() != WL_CONNECTED) { Serial.print('.'); delay(1000); } Serial.println("[WIFI] connected!"); HTTPClient http; // start request with URL and TLS cert fingerprint for verification http.begin("https://" + String(host) + String(path_with_username), fingerprint); // IO API authentication http.addHeader("X-AIO-Key", io_key); // start connection and send HTTP header int httpCode = http.GET(); // httpCode will be negative on error if(httpCode > 0) { // HTTP header has been send and Server response header has been handled Serial.printf("[HTTP] GET response: %d\n", httpCode); // HTTP 200 OK if(httpCode == HTTP_CODE_OK) { String payload = http.getString(); Serial.println(payload); } http.end(); } } void loop() {} ``` #### Client Libraries We have client libraries to help you get started with your project: [Python](https://github.com/adafruit/io-client-python), [Ruby](https://github.com/adafruit/io-client-ruby), [Arduino C++](https://github.com/adafruit/Adafruit_IO_Arduino), [Javascript](https://github.com/adafruit/adafruit-io-node), and [Go](https://github.com/adafruit/io-client-go) are available. They're all open source, so if they don't already do what you want, you can fork and add any
Netatmo
IoT<h3>Welcome to the Netatmo swagger on-line documentation !</h3> This site is a complement to the official <a href="https://dev.netatmo.com/">Netatmo developper documentation</a> using swagger to bring interactivity and easy testing of requests with the "try it" button (authenticate with the authorization code OAuth2 flow by clicking the authenticate button in the methods). You can find the source code for this site can be found in the project <a href="https://github.com/cbornet/netatmo-swagger-ui">netatmo-swagger-ui</a>. You can also use the online <a href="./swagger.json">swagger declaration</a> file to generate code or static documentation (see <a href="https://github.com/cbornet/netatmo-swagger-api">netatmo-swagger-api</a>).

Influx OSS API Service
IoT# Authentication <!-- ReDoc-Inject: <security-definitions> -->

ClearBlade API
IoTA friendly little API to help you interact with the ClearBlade platform.
Hardware Sentry TrueSight Presentation Server REST API
IoTHardware Sentry TrueSight Presentation Server REST API

Quick start - Telematics SDK
IoT# Introduction We have prepared a set of APIs for quick start to integrate telematics SDK that powers mobile telematics inside 3rd party mobile applications. * [CONTACT US](https://telematicssdk.com) * [SANDBOX](https://userdatahub.com) * [DEV.PORTAL](https://docs.telematicssdk.com) * [DEMO APP](https://raxeltelematics.com/telematics-app) # Overview Datamotion provides telematics infrastructure for mobile applications. Telematics SDK turns any smartphone into telematics data gathering device to collect Location, driving and behavior data. API services unlocks power of your mobile application There are 3 groups of methods: * 1 - user management * 2 - statistics for mobile app * 3 - statistics for back-end(s) in certain cases you will need SNS or any other notification services. read more [here](https://docs.telematicssdk.com/platform-features/sns) # Possible architecture There are three common schemes that are used by our clients. These schemes can be combined * Collect, Process, Store (required: 1&2) * Collect, Process (required: 1& sns) * Collect (required 1&sns) ## Collect, Process, Store 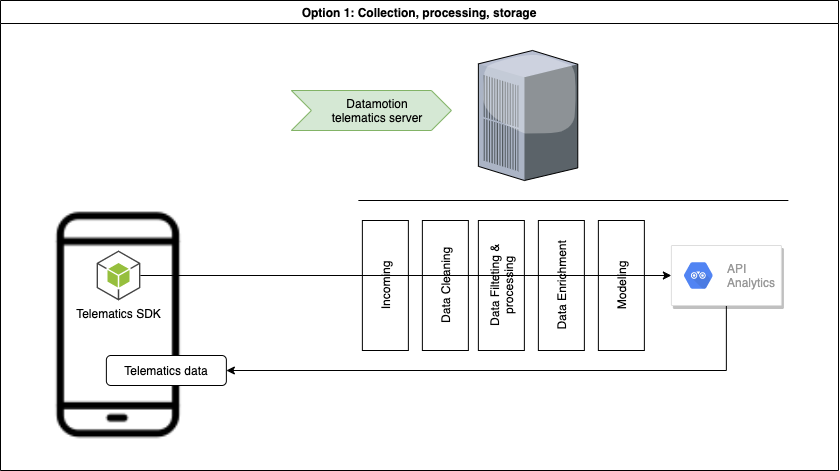 ## Collect, Process 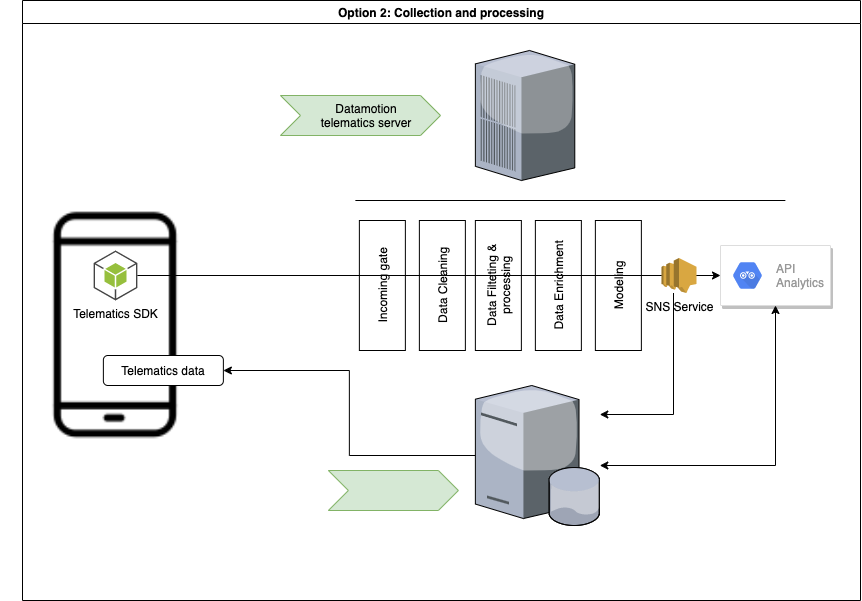 ## Collect 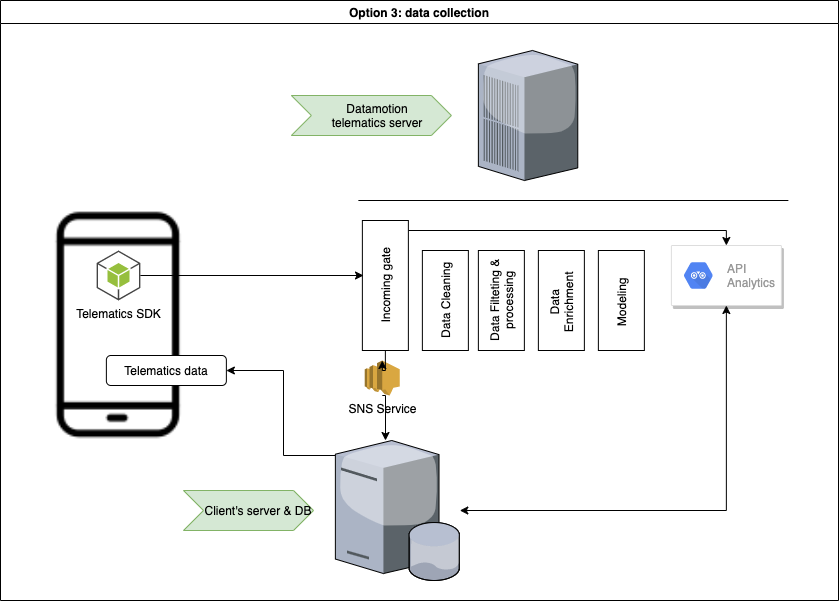 ***  # Common use-cases: * Safe and efficient driving * Usage-based insurance * Safe driving assessment * Driver assessment * Trip log * Geo-analysis * Accident monitoring * Driving engagements * Location based services * Realtime Tracking and beyond # How to start * Register a [SANDBOX ACCOUNT](https://userdatahub.com) * Get [CREDENTIALS](https://docs.userdatahub.com/sandbox/credentials) * Follow the guide from [DEVELOPER POERTAL](https://docs.telematicssdk.com) # Authentication To create a user on datamotion platform, you require to use InstanceID and InstanceKEY. You can get it in Datahub -> management -> user-service credentials Once you create a user, you will get Device token, JWT token and refresh token. then, you will use it for APIs

smart-me
IoTWith the smart-me REST API you get Access to all your devices in the smart-me Cloud and you can add your own devices. So its an easy way to add the smart-me Cloud support to your Hardware or Software Product.

groov View Public API
IoT#### Revised: 2019-11-21 ### Overview groov View Public API revision 1.

KeyServ
IoTThe subscription management service for rapid product development

MIMIC REST API
IoTThis is the API for MIMIC client to connect to MIMIC daemon.
PAC Control REST API
IoT#### Revised: 6/15/2018 ### Overview This API provides secure access to a SNAP-PAC-R or -S series controller's variable and I/O tags. Confidentiality for API transactions is provided by HTTPS. Authentication uses HTTP Basic Authentication with an API key. An API key ID is submitted in the Basic Authentication userid field and API key value in the password field. **For more information visit:** [developer.opto22.com](http://developer.opto22.com) ### Examples **Read an array** of all the integer32 variables defined in the PAC's strategy. For example, on your SNAP-PAC-R or -S series controller at IP address 1.2.3.4, you would use the URL: ``` https://1.2.3.4/api/v1/device/strategy/vars/int32s ``` and provide appropriate authentication. The GET response will be a JSON array of name-value pairs such as: ```json [ { "nMyVeryFavoriteNumber": 22 }, { "nWidgetsProducedToday": 22222 }, { "DELAY_LOOP_TIME_IN_MSECS" : 200 } ] ``` **Read the engineering units** (EU) of an analog input point configured in the PAC's strategy. For an analog input (I/O point) named aiTemperatureInDegreesF, use `https://1.2.3.4/api/v1/device/strategy/ios/analogInputs/aiTemperatureInDegreesF/eu` The GET response will be a single JSON name-value pair such as: ```json { "value": 72.22 } ``` ### Note on packet sizes: When doing POSTs or GETs, the JSON payload in the body should not exceed 3k (3072 bytes).